Customizing a panel layout
The initial layout created when you create a new comic document may be sufficient for a simple one- to four-panel strip, but for anything bigger, especially anything with multiple rows, you’re probably going to need more control over panel layout. Unless a regular grid with all panels the same size is the style you want to use, you’ll want to look at all the options for customizing your layout.
Dragging to resize rows and panels
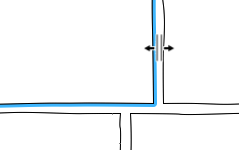
When you position the mouse cursor in the gutters (the space between the panels), the cursor changes to indicate that you can resize the panels or rows:
If you position it in the space between two panels in the same row, you can drag the boundary between those two panels left or right. The full space of the comic page that you specified will always be filled with panels, so making one smaller always makes another bigger.
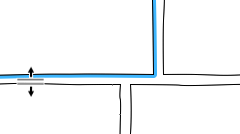
Positioning the cursor in the space between rows allows you to move that border up or down, making one row bigger and the other smaller.
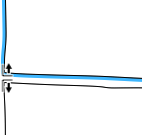
Positioning the mouse at the left or right end of a gutter between rows, you can drag to make that row boundary diagonal.
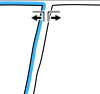
And you can make the border between two panels diagonal by positioning the mouse at the top or bottom of the boundary between panels and dragging.
For all panel resizing operations, the contents of the panels affected will be rearranged to keep them inside the panel and make them fit the new panel size better, but some additional manual rearrangement may also be necessary.
More panel editing: the Comic menu
Dragging allows you to break away from the initial regularity of the default layout in which every panel is the same size and shape, but you may want to customize even more. The Comic menu has many options for this.
Resize Comic...
Allows you to change the whole comic to a new size, scaling all rows and panels to fit. This command affects all pages of a multiple page comic. Any contents of the comic will be rearranged to fit new panel bounds.
Gutter Size...
Allows you to globally change the size of the gutters between rows and panels. This setting affects all pages in a multipage comic.
Page Margins…
This command allows you to inset the grid of panels more than usual from any of the four sides of the page. While the regular panel grid will stay within the margins, floating elements or free panels can go all the way to the edge of the page. This can be useful for creating things like this graphic from our website:

In a multipage comic, page margins can be applied separately to each page.
Panel Properties...
Opens a dialog allowing you to change appearance settings either for the current panel (the one highlighted with a blue outline) or all the panels in the comic. When applying it to all panels, it doesn't necessarily make all panels look the same, as it will only affect settings that you actually change in the dialog.
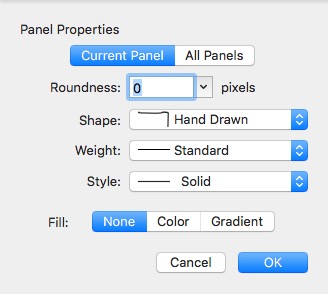
The Panel Properties dialog allows you to set attributes either on the current panel or all panels. The dialog’s settings start with the panel roundness, shape, weight, and style options that can also be set when you create the comic document. See Starting a comic for details about these panel attributes. The dialog allows you to set a background color or gradient for one or all panels. To select the type of fill, choose None, Color, or Gradient from the bar. For details about editing the fill, see Choosing and using colors or Editing gradients . When filling a panel with either color or gradients, there is a popup menu option that allows you to choose to draw the fill either all the way in the back or in front of the background layer. In conjunction with the ability to make transparent colors or gradients, or the Opacity slider, this can be used to put a transparent wash in front of the background. Many different effects can be achieved in this way.
Split Panel
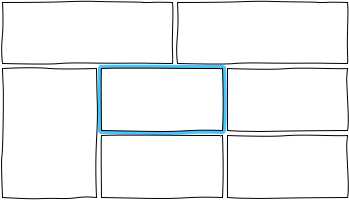
This command allows you to split a panel in two dimensions, making possible multiple rows within part of a row.

Here’s an example of a layout that this command makes possible:
Insert Panel Before and Insert Panel After
Insert a new panel before or after the current panel in its row. The space for this new panel is taken proportionally from the other panels in the row. In the case of a panel in a row within a row, as illustrated above, this would only affect the panels in the inner row.
Delete Panel
Delete the current panel, distributing the space it occupied proportionally to the other panels in its row. In the case of a panel in a row within a row, this would only affect the panels in the inner row.
Insert Row
Select a panel and choose Insert Row from the Comic menu to insert a new row either above or below the row containing the panel. In the case of a panel in a row within a row, the current row is the outermost row containing the panel, as in indicated by a green highlight that is shown while the dialog is open.
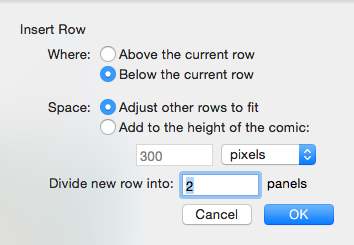
The new row can either adjust other rows to fit, in which case it will take height proportionally from all other rows, or add to the height of the comic by a specified amount. If the comic is resized by this command, the new size applies to all pages of the comic. A number of panels for the new row can be specified.
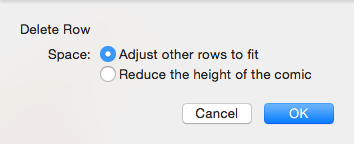
Delete Row
To delete the current row, which is the outermost row containing the current panel, choose Delete Row from the Comic menu. A green highlight shows what row will be deleted, and the dialog allows you to choose between redistributing the height to other rows or reducing the height of the comic. Changing the height of the comic affects all pages.
New Page
To add a page to the comic, choose New Page from the Comic menu..
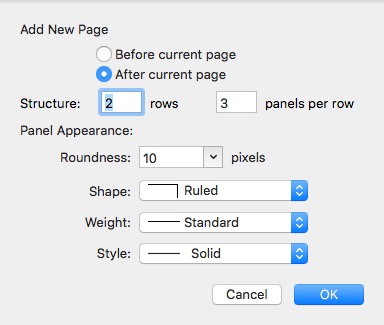
This dialog allows you to specify whether the new page should go before or after the current one, what the initial panel structure should be, and the appearance attributes of all the new panels.
Delete Page
To delete the current page of a multipage document, choose Delete Page in the Comic menu. It is only available if there is more than one page.