
Adding Backgrounds
This chapter assumes you are working in a Comic Document. If you need help getting started with that, see Starting a comic .
Comics in Comic Strip Factory have two layers for content in every panel: a foreground and a background layer. You can only edit one of these layers at a time. This makes editing easier. When you’re editing foreground objects (you’ll usually put your characters and text balloons in the foreground), you won’t be accidentally moving your backgrounds around. You can even marquee select foreground objects even if the background fills the whole panel, which would otherwise make marquee selection impossible. And when you are editing the background layer, the foreground objects become translucent so you can see your whole background and edit any part of it, but still know what is in front of it.
You can switch between background and foreground editing with this control at the top of the comic window:
The layer control
Before bringing in background art, you should choose the Background layer from the layer control.
To see the backgrounds available in Comic Strip Factory, click the Scenery tab in the pane in the bottom half of the comic window. Comic Strip Factory includes a number of different Scenery files, and you can create your own as well. Scenery files are the same type of file as Character files, just marked as containing scenery. The two types of library file are also called Parts files.
Click the scenery file called Country Scenes to open it into the comic’s library. If you scroll around this file, you’ll see it contains two scenes: one with a grassy hillside, the other with a dirt path. Many scenery files contain only one scene. If you look below the two scenes, there are also a split rail fence and a stone wall. These extras can be incorporated into either scene if you like. Most of the scenery files contain some additional props or scenery pieces designed to be used with them.
Additionally, each scene is usually a group and contains some parts you can decide to move or remove or otherwise edit.
To use a scene in one of your panels, just drag it up from the library at the bottom of the window and drop it in the panel in the comic.
If you forgot to set the current editing layer to Background before doing this, your background scene may now be completely obscuring any foreground objects you already added to the panel. If this is the case (the layer control is set to Foreground), select the scene and choose Move to Background Layer from the Objects menu.
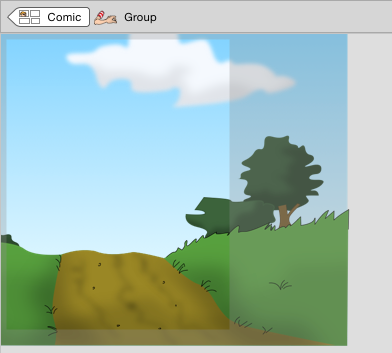
Here’s what your panel may now look like:

A scene in the background of a panel
Maybe this is just what you wanted. But you may think you’re not seeing exactly what you had hoped for. Backgrounds are always clipped to a panel edge, and your scene may be bigger than your panel, as seen here. Actually, the scenes are designed to be bigger than the typical panel, because you don’t want to see the edge of the scene with white space behind it. But in this case, too much of the interesting part of the background isn’t visible. There are several ways to deal with this.
Make the panel wider. But you probably want your panel width to look good with the characters you put into it, too.
Resize the scene. In this case, you can resize from a corner, which resized proportionally, only a little bit before you start seeing white space at the bottom. Bt you may be able to resize horizontally only, depending on the scene. It can work with this one, but with some scenes, some parts may end up looking out of proportion.
Drag the scene to the left or right to see a different part of it.
Edit the scene to bring more interesting parts of it into view.
While you’re thinking about this, the Control labeled “Focus on” allows you to see what you are missing. If you switch it to panel, you can see all of the contents of the panel, not just what is visible inside its bounds. That might give you the idea, “Hey, I could just move that tree into view.” Just remember to change the focus back to the Comic when you’re done. Until you do so, you can’t edit any other panel, and the comic won’t be in a what-you-see-is-what-you-get view.
For more about the option to make the panel wider, see Customizing a panel layout .
The resizing and moving options for improving the appearance of the scene in your panel should be fairly self-explanatory.
Editing a scene
The scene you dragged in, like most scenes in Comic Strip Factory, is a group. You can tell this because its selection frame uses large dashes. As a group, it is something that you can pretty easily edit without mucking it up. To edit the scene (the group), just double-click it.
Editing a scene group
Note that to return the the main view, click the left-pointing button labeled Comic at the top. But not now.
What is shown now in the editor window is the contents of the group. If you click around within it, you will find that things like the ground, the shrubs and trees, the sky, and even the cloud are separate objects. This allows you to recompose the scene. You could, for example, scale the ground smaller horizontally, move the tree to the other side of the path, move the lower shrub closer to the path, and bring the cloud more into scene, and end up with it looking like this:
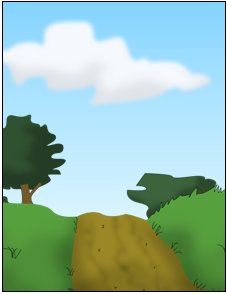
Recomposed country scene
You can also delete objects, scale individual objects, or drag in new objects, like the stone wall.
When you are done editing the group, click the left-pointing Comic button to return to the comic.
Using background as foreground
You may find that you want your characters to interact with something in the background scene group in a way that the grouping of the background and the separation of the layers doesn’t seem to allow. For example, imagine you want to see a character walking up that path toward you from other side of a hill. This may seem impossible but it’s pretty easy. First, select the scene and choose Ungroup from the Objects menu. (If you can’t do this, are you in the main Comic view? If not, go there.) Then deselect them all (you can use Deselect All from the Edit menu if this doesn’t seem easy) and select just the ground object. Then choose Move to Foreground Layer from the Objects menu.
It may be that nothing will seem to have changed, but you are now in foreground layer editing mode and the ground is there with you. To complete the scene, just drag in your walking character. You may have to resize him and position him appropriately. Then put him behind the ground object by choosing Send To Back from the Objects menu. This works exactly as you wanted, leaving the character in front of the rest of the background but behind the ground, because the command only sends the character to the back of the layer it is in.
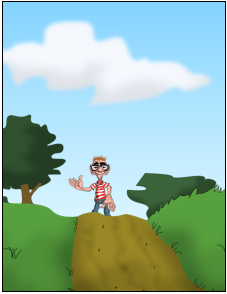
Scene with Fred
You could have accomplished a similar appearance by moving the character to the background layer, or even by dragging him directly into the scene’s group editor.